When you use the Internet or visit a website, you may encounter many problems. The Dns_Probe_Started Error message is one of the most common messages.
Although this domain name server (DNS) issue is annoying, you don’t need to worry about it.
You can fix this problem and get back to a smooth browsing experience with a simple, quick, easy-to-understand solution.
This post aims to explain the DNS_PROBE_STARTED error and what it usually means. Here are Three different ways you can fix it. Let’s get started!
Contents
Main Causes of DNS_PROBE_STARTED Error
The Dns_Probe_Started Error notification has a few common causes. First, your DNS server may be unavailable.
It can also be due to misconfiguration of your network setting or DNS.
A few common Dns_Probe_Started Error messages may occur because the DNS server may be down.
With your network editor, you can route it to any sound. If you have antivirus or firewall software, it can prevent DNS requests from going through. This causes this error message.
How to Fix Dns_Probe_Started Error? [3 Solutions]
There are several ways to fix the Dns_probe_started Error and DNS_PROBE_FINISHED_BAD_CONFIG. The most important of them are discussed below.
1. Change Your IPv4/IPv6 DNS Address
Change your IPv4/IPv6 DNS address. Changing IP addresses is the first thing you can try. Without going into details, there are some minor technical differences between these Internet protocols. IPv6 is the latest version, but IPv4 is still the most widely used.
You can choose from many good alternatives. Some of them come from big companies like Google Chrome due to DNS Address Could Not Be Found Google Chrome and Cloudflare.
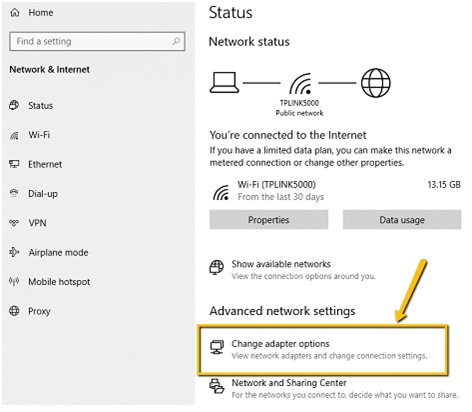
- Go to All Settings > Network & Internet > Change adapter settings options.
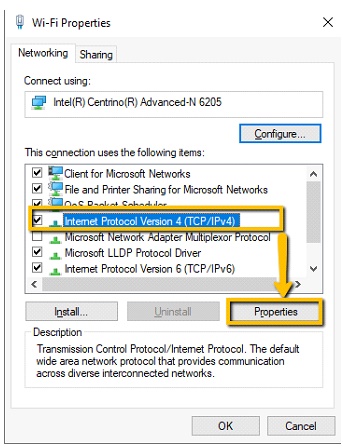
- Right-click your network adapter and select Properties from the menu.

- Select Internet Protocol Version 4 and then Properties.
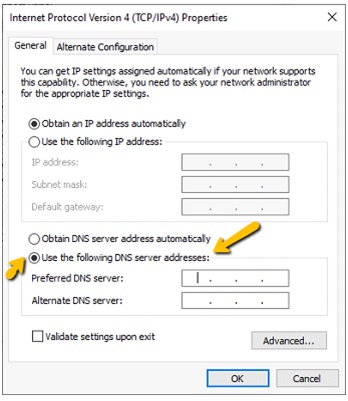
- Select “Use the following DNS server addresses.” Just below the obtain DNS server address automatically option.
- Enter 8.8.8.8 as the preferred DNS server and 8.8.4.4 as the Alternate DNS server to use Google’s Public DNS.
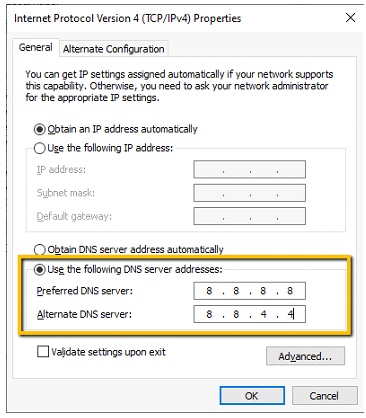
- Cloudflare’s DNS can be used by typing 1.1.1.1 in the Preferred DNS server field and 1.0.0.1 in the Alternate DNS server field.
- By selecting OK at the bottom, you will save your changes.
2. Disable Your Firewall and Antivirus
Chrome may show a DNS probe started error if your antivirus or firewall blocks your site. In this scenario, disable your antivirus and firewall and see whether your website loads.
The following steps will show you how to disable Windows’ built-in antivirus and firewall:
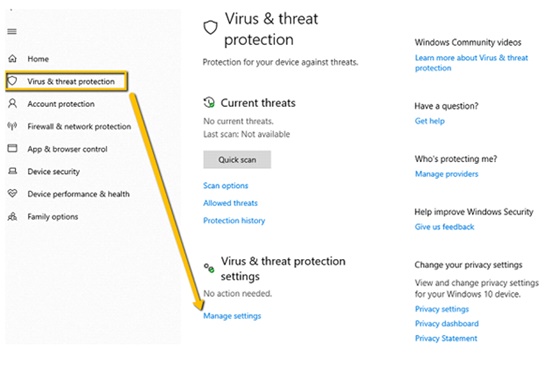
- Go to the Start menu, search for Windows Security, and select that option.
- You will find Virus & threat protection on the left and Manage settings on the right.
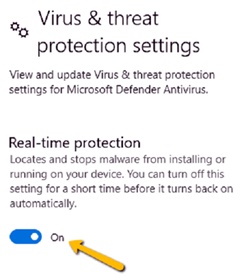
- Turn off Real-time protection.
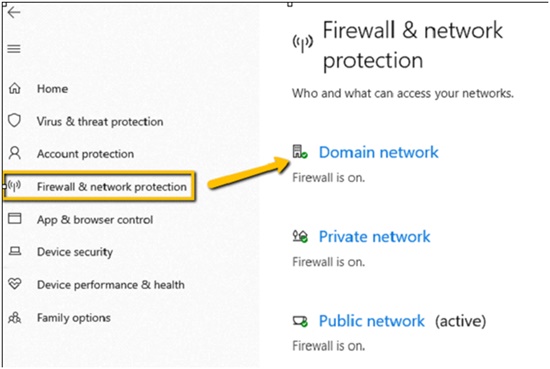
- Firewall & network protection can be found in the left sidebar.
- Select the Domain network and disable Microsoft Defender Firewall. You will need to repeat this step for private and public networks.
- Get Chrome open and load your site.
3. Update the Network Adapter Drivers.
Updating the drivers for your network adapter is just as important as updating the drivers for your other hardware.
When you update or reinstall your network drivers, you get fixes for the DNS server not responding, new features, and general improvements that help fix several problems. Uninstall and reinstall some drivers to fix the error.
Because Windows automates the driver update procedure, there’s no reason why you shouldn’t use this method to resolve the “DNS probe started” problem.
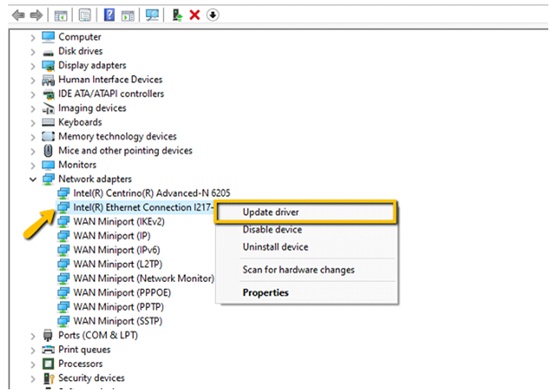
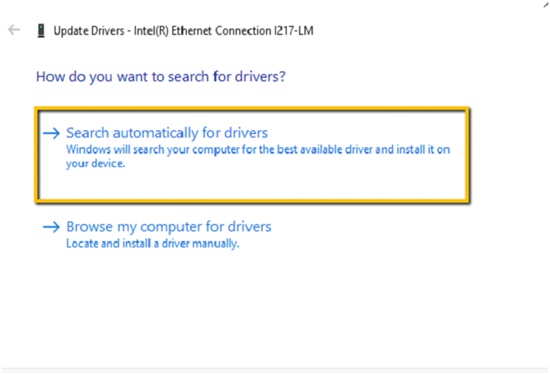
- Right-click the Start menu icon and search Device Manager.
- Right-click on Network adapters and then choose Update driver.
- Let Windows install the appropriate drivers by selecting “Search automatically for drivers.”
Frequently Asked Questions (FAQs):
How do I fix DNS probe error?
First, checking that the device is connected to a secure and reliable network is essential. If not, then a different network should be used to ensure that the DNS settings are correct.
Additionally, clearing the browser’s cache and cookies may help resolve the issue. Users should also ensure their computer’s time and date settings are correct by going into the computer’s “date & time” setting page; this might require adjusting or updating the location settings.
If these steps do not work, a user may need to switch their DNS provider from their current one by accessing their router settings page.
How do I fix DNS on Google Chrome?
First, open your Windows 10 settings. At the bottom right, select the time and the Wi-Fi network from the drop-down menu. Then select your wireless network and click “Network & Internet” on the left side of the screen. Scroll down, select “Change Adapter Options,” and right-click on your wireless connection.
Select “Properties,” then highlight “Internet Protocol Version 4 (TCP/IPv4)” and click Properties again. Click the “Use The Following DNS Server Addresses” section and type in 8.8.8 as the Preferred DNS server address & 8.
How do I unblock DNS on my router?
If you’re trying to figure out how to unblock DNS on your router, a few steps are involved. First, log into the web-based control panel of your router.
Once logged in, look for an option called “DNS Settings” and select it. Then enter the IP address of the new DNS server or hosting service provider you wish to use as a replacement for your current one. Finally, click “Save” or “Apply” and restart your router for the changes to take effect.
How do I reset my DNS settings on my browser?
To reset your DNS settings on the browser, first, open up the command prompt window and then type in “ipconfig flushdns” without quotes. This will clear out any old or incorrect information stored in the cache of your computer’s operating system, which could be causing connection issues when attempting to access websites.
After entering this command, reboot your computer and try reaccessing sites to see if this has fixed the problem.
Conclusion
If you do any of these things, it may help you solve the problem. However, only try one at a time to see if it fixes the problem. However, try to follow the procedure to avoid making mistakes. The error should no longer be displayed.