Contents
What is a service host superfetch windows 10?
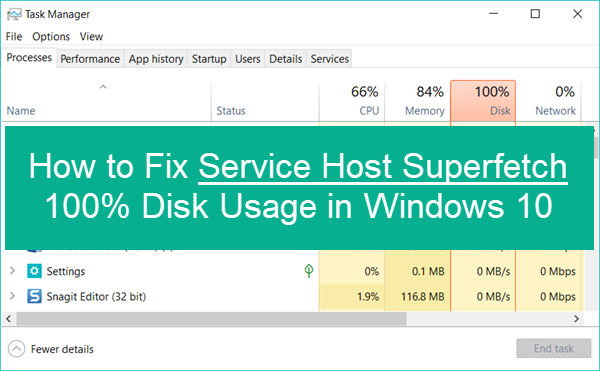
Sometimes your Windows CPU uses too much of your system resources. It causes a slower Windows performance along with high disk usage. Since you are on this page, we can safely assume you have figured out that the Service Host Superfetch is causing the 100% CPU usage error. So, here we are with the complete guide to help you fix the Service Host Superfetch high CPU usage error. Let’s roll!
What does service host superfetch do?
Superfetch comes in Windows Vista and later versions of Windows. The best job for your Windows service host is managing random space for the applications on your system. The applications include third-party programs as well as important Windows components. While super fetch runs correctly on your computer, your applications can execute and perform their tasks quickly.
For the apps you regularly use, superfetch stores the data of those applications in RAM. And when you launch those applications on your system, they read those data from the RAM instead of the hard drive. Hence, it takes relatively less time, and the apps launch more quickly. In simple words, superfetch boots up your system speed in these three ways-
- It decreases booting time
- Loads the most used apps quickly
- And gets used to your usage pattern
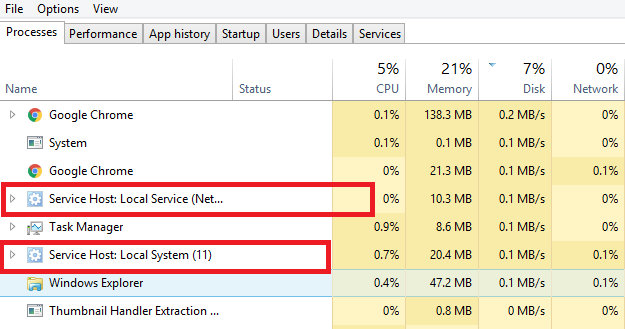
Which Cause Superfetch High Disk Usage?
Superfetch makes using your most common apps easier by complying with the user files to your system’s RAM. Therefore, your applications take considerably less time to be launched on your system. However, if your PC does not have updated drivers or the latest hardware solutions, Windows superfetch can cause 100% CPU usage.
The only problem with this error is that your CPU gets too hot, and it can cause panic among some users. But otherwise, it is rarely harmful to your device. The Windows feature helps your system to respond to I/O requests and clears up RAM to upload new files from the applications you have been using. You will feel high CPU usage when the service runs on your computer. When the feature completes its work, the high CPU usage will be automatically lower.
How to Reduce 100% Of Disk Usage Caused by Host Superfetch?
If you are using your system and Superfetch is unusually interrupting your RAM, it can be a problem. Due to this, the size of the files increases, and it takes more system memory. However, there are some ways you can sort this problem out.
If the service is always taking up too much of your CPU memory, disabling it will be an option. Moreover, if you disable the service, it won’t misbehave on your system, and you will be able to use it like before. But it may cause a side effect on some of your apps that they won’t load fast like back. Follow the methods given below to disable the Service host superfetch.
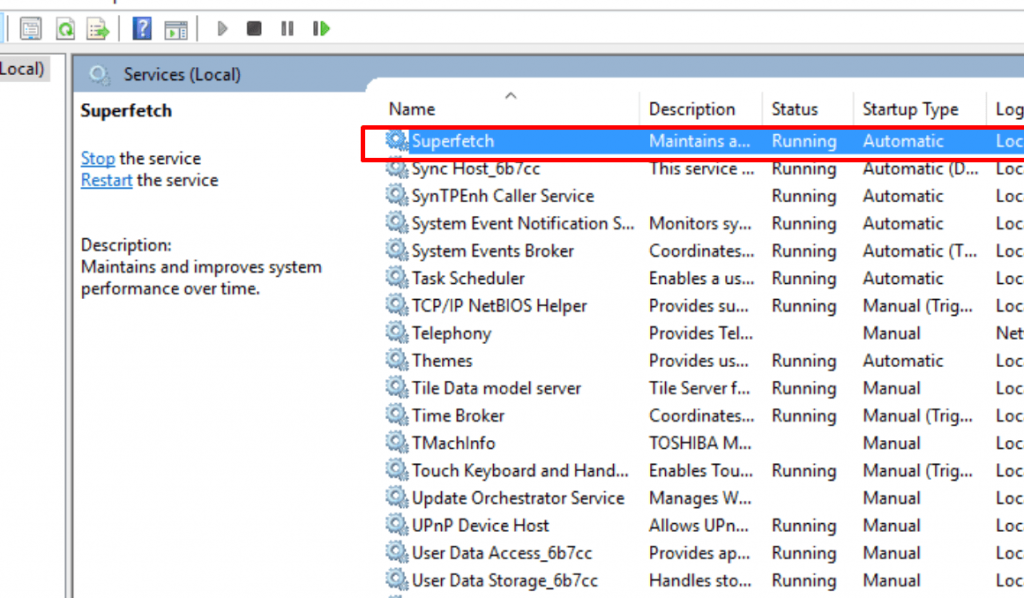
Method 1: How to Disable Superfetch from Services
To disable service host superfetch, try out these steps-
- Open the Run box by pressing Windows key + R
- Or hit your Start button and type run in the search bar
- Type ‘services.msc’ in the run box and hit Enter
- The services window will appear and from there, locate Superfetch
- Right-click on it and select Properties
- Click Stop on the Properties window
- A drop-down menu will appear; from the ‘startup type’, click on Disable
Now go back to the task manager window and you will see that service host superfetch is not causing any more high cpu usage. If the method does not work, try the next one.
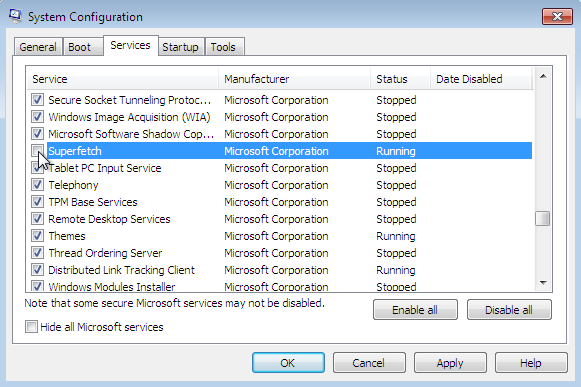
Method 2: Fix it from Windows Registry
Use the Windows Registry to disable the service and reduce memory usage.
- Hit the Windows key + R key simultaneously and open the Run box
- Type “Regedit” in the run box (don’t include the quotes)
- Hit Enter
- Go to the HKEY_LOCAL_MACHINE folder from your Windows regsitry
- Navigate to SYSTEM > CurrentControlSet > Control > Session Manager > MemoryManagement > PrefetchParameters
- From the right-side, double-click on ‘Enable Superfetch’
Possibly, the value will me mentioned there. If not, the below steps will help you out-
- Do a right-click on the PrefetchParameters folder
- Go to the options and open New > DWORD Value
- Enter 0 and disable the service
- Click OK
- Finally, close the registry editor
When you open Task Manager again, you won’t find the service host superfetch messing with your CPU. You can efficiently perform any of these two methods to bring your system back to life. Both ways work like a charm so that you won’t face trouble again. Still, make sure to comment below in case you have any queries. Stay connected for more tech guides.