WSAPPX high CPU error is one of the most frequent errors that pop up on our Windows 10 or Windows 8 screen. Though it is not a virus WSAPPX High CPU usage does slow down our system and therefore needs to be fixed. There are several methods to fix this in-built feature like updating the system drivers, increasing the virtual memory, and many more.
Contents
What is WSAPPX in Windows?
The WSAPPX is a Windows feature that runs on your Windows computer as a part of the Windows Store or Microsoft app portal. The feature is especially used for installing updates and installing or uninstalling Microsoft Store apps. It is a feature that was introduced from Windows 8 onwards. Therefore, people using OS older than this do not have WSAPPX, hence not facing the WSAPPX high CPU error.
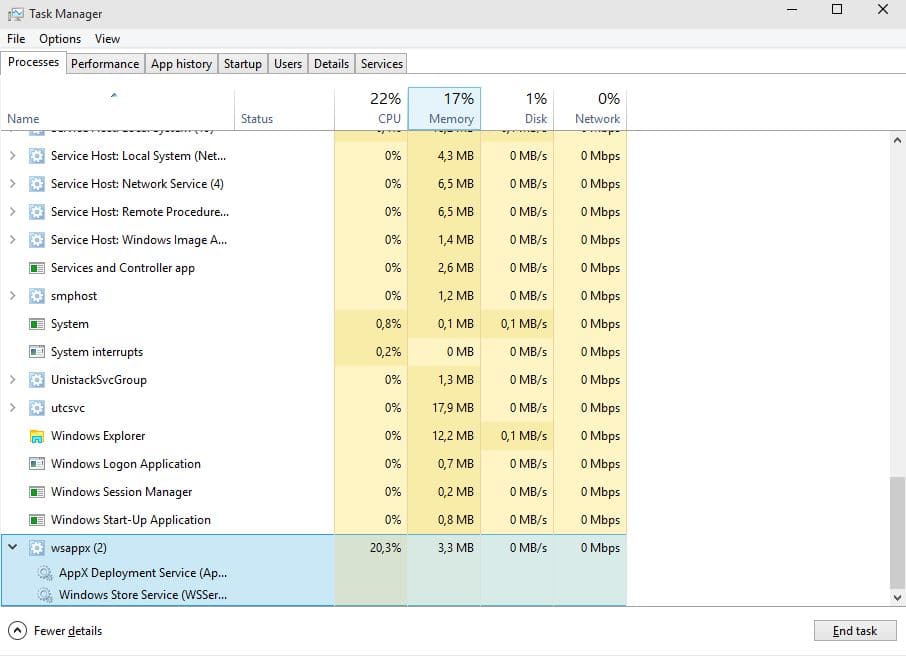
Sometimes its service becomes unresponsive, it freezes often and consumes too much of the CPU resources. Thereby leading to the popping up of WSAPPX High CPU usage error. There are two sub-services of WSAPPX namely- the Appx Deployment Service (AppXSVC), Client License Service (ClipSVC), which also run in the background.
AppX Deployment Service (AppXSVC): This service deploys Windows Store apps. In simple words, this process installs, uninstall, updates Windows Store applications. Therefore, when your computer is installing an application in the background, you can see this service consuming your CPU resources. Users also find this app running even when they are not installing anything.
Client License Service (ClipSVC): This service handles infrastructure support for your Windows 10. According to the Windows conditions,”if you disable this service, the applications you have purchased from the Windows store might behave incorrectly”. The Client License Service manages the license for your purchased applications so that you can use them without an issue.
Apart from these two, there is another service associated with the WSAPPX Windows feature.
Windows Store Service (WSService): This service is apparent in the Windows 8 version. It is similar to the ClipSVC service except this does not come in the Windows 10 version. Like ClipSVC, it handles infrastructure support for your Windows Store applications.
Why Does WSAPPX Consume So Much of CPU Resources?
When you are installing updates or apps and uninstalling applications from Microsoft Store, it consumes some percentage of the CPU. In case the service is consuming more CPU resources, this is because it is installing or uninstalling an app in the background.
To disable it, visit the Windows Store and on top, click on the user icon. And then disable automatic app updates when the next window pops up.
WSAPPX High CPU Usage Fix: 8 Easy Steps
If you have tried to disable the service from Windows Services, a pop-up shows “if you disable the service the action may affect other apps”, it is because of WSAPPX high CPU usage error. You can fix this WSAPPX high CPU usage by following various methods.
1. Update Your System Drivers
Sometimes outdated drivers can cause a lot of trouble. So even if the WSAPPX High CPU Usage is not related to drivers, it can come up due to a faulty driver error So, these steps can help with a faulty or malfunctioned driver-
- Find the Device Manager window from your Start menu
- Select a category to find names of various devices
- Right-click on the device you have to update
- Choose Search automatically for updated driver software
- Then click on Update Driver
- You can find new drivers on the manufacturer’s website of your system
- After installing the correct device, reboot your computer
Most of the time, this solution fixes the high disk usage problem.
2. Increase Virtual Memory
You can increase the virtual memory of your system, which may solve WSAPPX high CPU error usage. Follow the step given below-
- From the Start menu, search for performance
- Select Adjust Appearance vs. Performance in Windows option from the list of the options
- Click on Advanced and select Change
- Uncheck the Automatically manage paging file size for all drives box
- Choose the folder where your Windows operating system is installed
- Then click on Custom size
- Type the size of your RAM in the Initial size space and double that size in the Maximum size space. For instance, if it is 300, double it by 600.
- Then click on Set
- Click on OK
- Restart your computer
3. Disable Windows Store
To disable Windows Store, you will have to follow one of these methods, Group Policy Editor or through Registry Editor. Here are the steps for both of the methods-
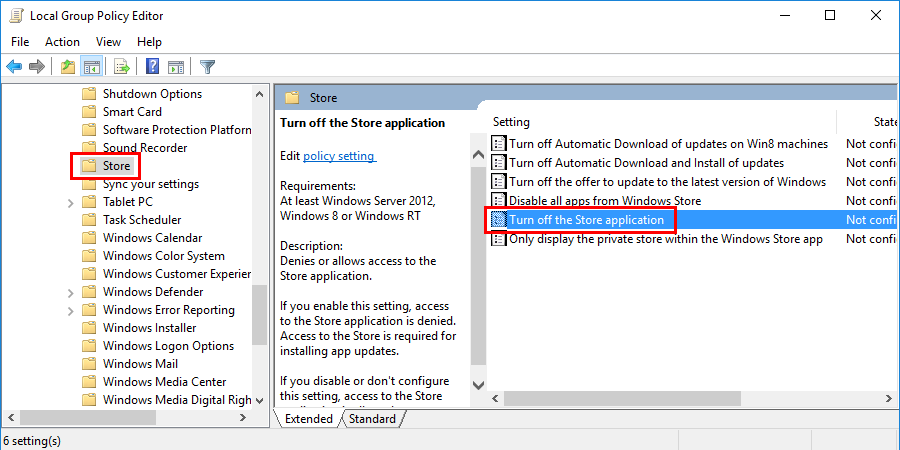
Using Group Policy Editor
- To open the Local Group Policy Editor, you will have to type and enter gpeedit.msc in the Windows search bar
- Open Computer Configuration and select Administrative Templates
- Then open Windows Components
- Select Store
- Find the Turn Off Store application settings and click on Edit
- Select Enable and click on Apply
4. Using Registry Editor
Some of the Windows versions don’t come with the Group Policy Editor option. But you can use the registry editor after backing up all your data safely.
- Go to Windows search bar and then type and enter Regedit
- Then open Registry Editor
- Go to HKEY_LOCAL_MACHINE\SOFTWARE\Policies\Microsoft\WindowsStore key
- In the Windows Store key, enter a new DWORD value
- Then rename the service to RemoveWindowsStore and create a new value a 1
- If there is no WindowsStore Key, you may have to create it
When you disable Windows Store, you restrict updates and installation of third-party apps. And after disabling it if you try to open the store again, it displays this error message:
“Windows Store isn’t available on this PC. Contact your system administrator for more information.”
As some apps on our computer (e.g Calculator, Movies & TV, Mail, OneNote, and Photos) which receives automatic updates oftentimes. If you disable the feature, you lose access to free updates.
5. Disable Superfetch and Windows Search Services
Disabling Superfetch and Windows search services work in some cases of WSAPPX high CPU usage error. So, follow these easy steps-
- Open the Run Box by pressing Windows key + R together
- Type services.msc in the Run box and hit Enter
- Find the Superfetch service and select it
- Click on the run-down menu besides Startup Type and then select Disabled
- Click on Apply and then select OK
- Find Windows Search from the previous window and double-click on it
- A drop-down menu will appear and besides Startup Type, click on Disabled
- Click Stop on Running services
- Click on Apply
- Press Ok

6. Run a System Scan
If you have done all the methods given above and still can’t fix the wsappx high disk usage error, then use an antivirus to run on your system. Scan your computer with a reliable antivirus program, you can be sure that a malicious file does not cause the error.
7. Do a Clean Boot
You can perform a clean boot on your computer, allowing your system to run specific programs and driver sets. So you are more likely to find out what is causing the high CPU usage issue.
8. Run Windows Troubleshooter
Windows Troubleshooter is the in-built feature that diagnoses common Windows problems and fixes those; it does not help in many cases still it is an option. To start with, go to your settings app and search for “troubleshoot.” Select “troubleshoot” from the list of options
Under the “Find and fix other problems” option, click on “Windows Store Apps.” Click on the opportunity and select “Run the troubleshooter.”
This would resolve the issue with Windows wsappx process.
WSAPPX High CPU Usage Error FAQs
Can you disable the WSAPPX service?
You can end the WSAPPX process from Task Manager and disable the service. Go to your Task Manager to kill the process. But this solution only works temporarily.
Is the WSAPPX service crucial?
This Windows service is apparent in Windows 10/8 OS which lets you update, install, and uninstall apps from Windows Store. Based on your interest you can see, how important this service is. It varies from user to user.
Can the WSAPPX service be a virus?
No user has ever reported that. It is a service of Windows Store but if you are worried that it can be a virus, you can perform a scan to be assured of it.
Though the WSAPPX Windows feature causes high CPU usage sometimes, it is still an essential system service. Try the methods listed here to fix the WSAPPX 100% disk usage problem on Windows 10.
What is Wsappx high CPU?
The WSAPPX is a Windows feature that runs on your Windows computer as a part of the Windows Store or Microsoft app portal. The feature is especially for installing updates and installing or uninstalling Microsoft Store apps.
Can I end Wsappx?
Yes, you can end Wsappx by updating system drivers, increasing virtual memory, disabling Windows store, using group policy editor, or using the registry editor.
Why do WMI provider host high CPU?
Windows Management Instrumentation (WMI) provider host uses high CPU capacity because-
- One or more processes are using a high number of handles
- One or more processes running on the system are using lots of memory
Is Wsappx a virus?
No, it’s not a virus, it’s just a Windows feature.
Why is my disk usage so high?
Your disk usage may be high because something is causing your hard drive to over-work.
You can fix it by-
- Disabling SuperFetch service
- Updating your device drivers
- Performing a disk check
- Resetting Virtual Memory
- Disabling Antivirus Software temporarily
- Fixing your StorAHCI.sys driver
- Switching to ChromeOS
Is 100 percent disk usage bad?
Yes, 100% disk usage is bad as it affects your FPS.
Will SSD fix 100 disk usage?
Yes, running on an SSD can fix 100 disk usage.
How do I update all my drivers Windows 10?
Update the device driver
- In the search box on the taskbar, enter the device manager, then select Device Manager.
- Select a category to see names of devices, then right-click (or press and hold) the one you’d like to update.
- Select Search automatically for updated driver software.
- Select Update Driver.
- If Windows doesn’t find a new driver, you can try looking for one on the device manufacturer’s website and follow their instructions.
Reinstall the device driver
- In the search box on the taskbar, enter the device manager, then select Device Manager.
- Right-click (or press and hold) the name of the device, and select Uninstall.
- Restart your PC.
- Windows will attempt to reinstall the driver.
There are many reasons for your system to slow down but WSAPPX high CPU error is a system error faced only in windows 8 or windows 10 operating systems. Many people confuse WSAPPX as a virus or malware but it is not, it is an inbuilt feature that can be stopped anytime.